5 Awesome Free Programs for Landscape Design

As an independent consultant, I often find myself researching open source software in order to cut costs and replace the standard tools we are so used to (Adobe, CAD, etc). However, in order for a software to become a candidate worthy of consideration being free is not in itself compelling reason to make the jump. Beyond being stable and bug-free, it also has to have the support of a large community of users in order to track support and stability/legacy.

1. Blender

This is hands down my favorite 3D modeling and rendering program of the past year! I have replaced my entire pipeline with Blender (former Rhino/Grasshopper + VRAY).

Here’s a really good summary from the website:
“Blender is a free and open source 3D creation suite. It supports the entirety of the 3D pipeline—modeling, rigging, animation, simulation, rendering, compositing and motion tracking, video editing and 2D animation pipeline.”

The most compelling reason for me however is the inclusion of Cycles. Cycles is a built in ray-tracing engine that in my opinion does a really good job of rivaling VRAY, Octane, and all many of the other professional suites.

If you’re interested in learning Blender, I highly recommend the official youtube channel.

TYPE
3D Modeling, Visualization

WEB
3D Modeling, Visualization

2. Krita

3. qGIS

4. FreeCAD

5. Scribus

International Transit Station

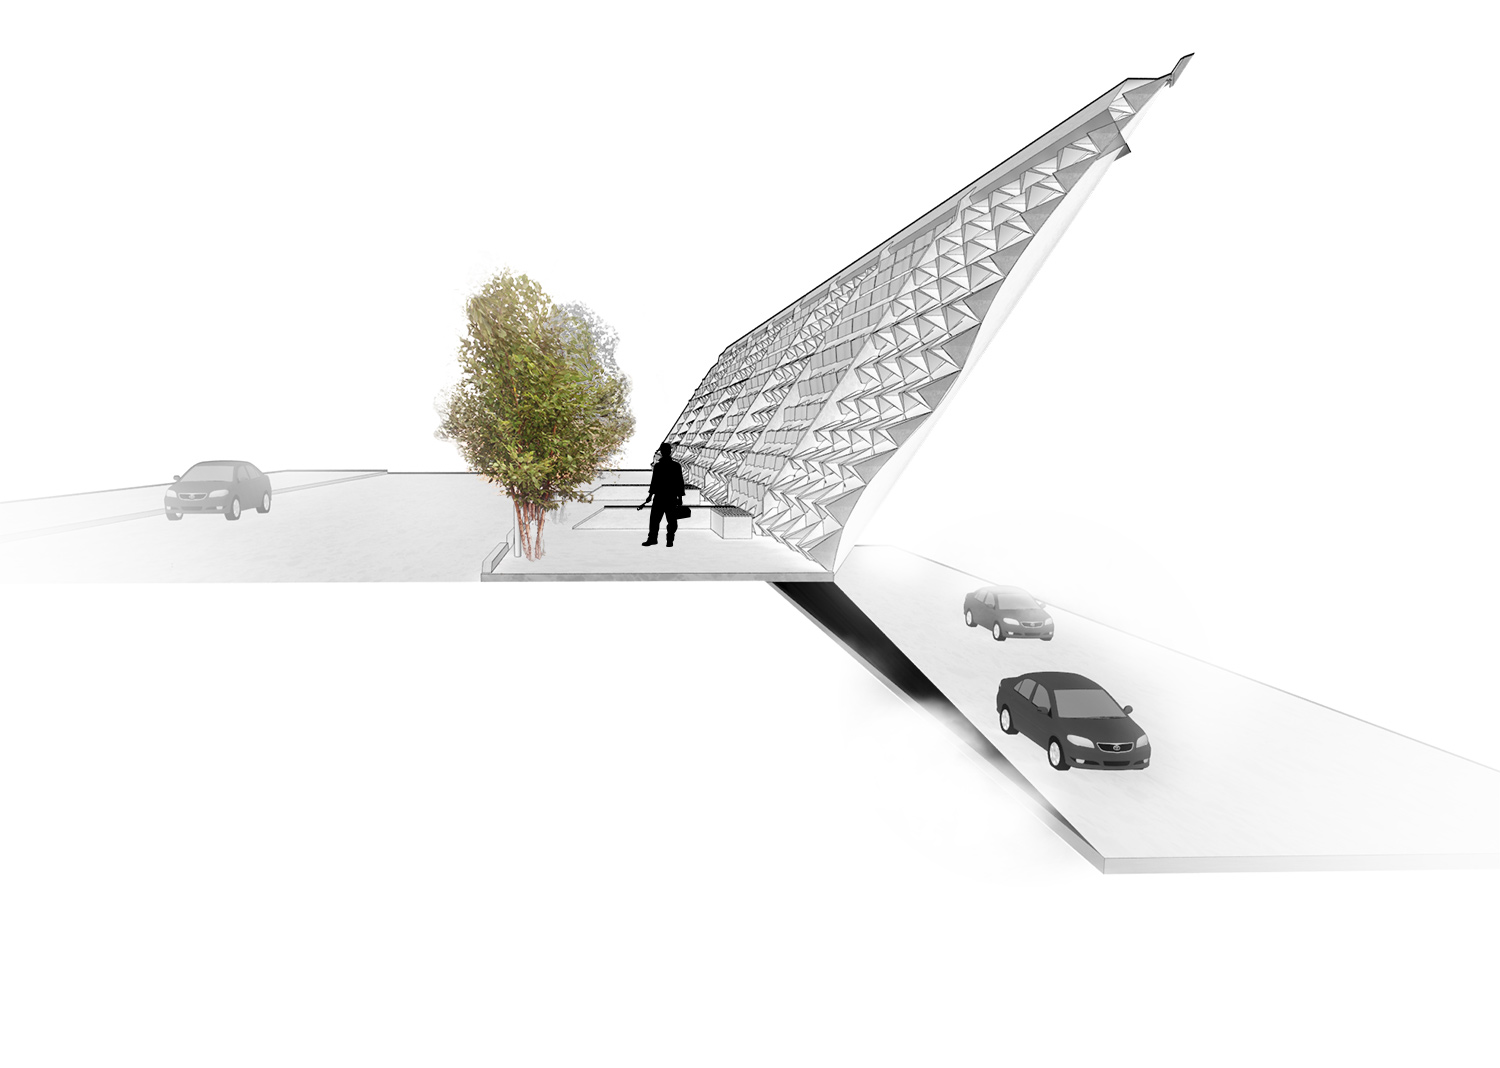
Together with Perkins + Will I provided BIM design and development for an international multi-modal transit hub. The landscape architecture team was responsible for the design of all outdoor and indoor public environments. These iconic spaces were generated by incorporating high volume traffic flow studies.

In order to coordinate with several multi-disciplinary teams located in various countries, Revit was implemented as the primary tool for design and documentation. This allowed for an efficient and streamlined process that involved live model interaction and clash detection.

CLIENT
Private

LOCATION
Saudi Arabia

TEAM
Private

LANDSCAPE ARCHITECT
Private

ROLE
Project Designer

landscapeaxo_roof-render
Case_Study_04_BIM
Case_Study_04_BIM2

University Campus – BIM Documentation

This project aims to construct approximately 3,000 beds of student housing, a child care center, living-learning amenities, supports spaces, site and utility infrastructure and a dynamic social and academic Hub inclusive of food service facilities, engaging spaces for study and wellness activities, and outdoor plazas and connector spaces for the community and campus at large.

Due to the scale of the project and in order to coordinate across multi-disciplinary teams located in California, Oregon, Seattle, and Illinois, documentation in Revit / BIM 360 was implemented. As part of the Walker | Macy team in Portland I lead the transition into Revit for site documentation.

CLIENT
UCSC

LOCATION
California, USA

TEAM
HED, Capstone

LANDSCAPE ARCHITECT
Walker | Macy

ROLE
BIM Lead, Job captain while at Walker | Macy

Gen_Diag_BIM_Uni_Campus_00
Case_Study_00_BIM_Campus
Case_Study_00_BIM_Campus2
Case_Study_00_BIM_Campus3
Case_Study_00_BIM_Campus4

Parametric Bench Surface

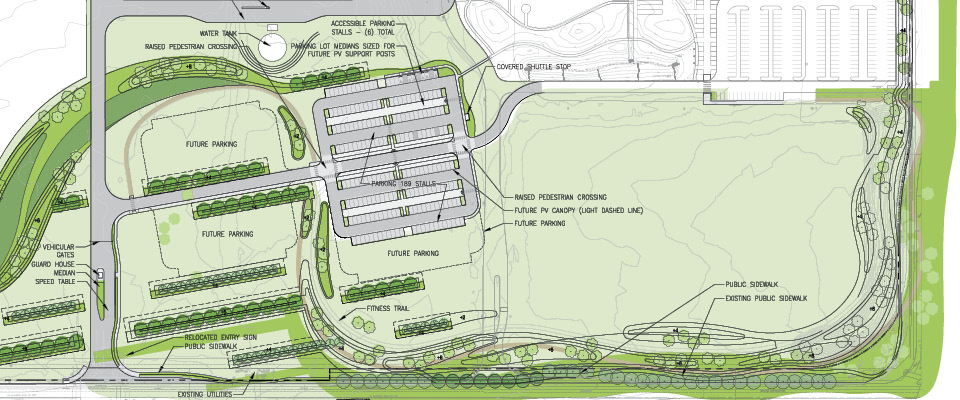
As part of the OPSIS/Walker Macy team, I assisted in the design and documentation of new site intended to accommodate new workshop and classroom facilities. To locate the main entrance of the new building, a series of decorative benches that celebrate the metal fabrication specialization of the college were envisioned. Using parametric design tools (Grasshopper / Rhino 3D) a series of evocative images were translated to a series of perforated backlit meshes.

CLIENT
Clackamas Community College

LOCATION
Oregon City, USA

TEAM
OPSIS, KPFF

LANDSCAPE ARCHITECT
WALKER | MACY

ROLE
Project Designer

Case_Study_02_Parametric
Case_Study_02_Parametric2
Case_Study_02_Parametric3
Case_Study_02_Parametric4
Case_Study_02_Parametric5
Case_Study_02_Parametric6
Case_Study_02_Parametric7

Building Terrain and Shelter through Generative Design

While working on a large campus for an international medical supplies company I applied Grasshopper/Rhino 3D schemes to quickly prototype topographical and planting design typologies. This gave the team an opportunity to visualize various concept options in real-time.

Using simple rules and native Grasshopper components, we created frameworks from which the profiles and sections of topographical berms could be shaped directly in 3D through a visual aid.

The team also explored Grasshopper functions to prototype different planting layouts. These parametric schemes were developed and presented in real-time to test out the feasibility of several design options. In particular, the planting for the graded berms called for a blended gradient between two different species. After the layout was finalized in Grasshopper it was converted to CAD for final sheet production.

CLIENT
Private

TEAM
Hacker

LANDSCAPE ARCHITECT
Walker | Macy

ROLE
Project Designer

Case_Study_01_Parametric_D2
Case_Study_01_Parametric_D3
Case_Study_01_Parametric_D4
Case_Study_01_Parametric_D5
Case_Study_01_Parametric_D

The Art of Rendering

Hi!

This post will give a general overview of the tools used to create some of these snazzy architectural vizualisations you see floating around Pinterest. I’ve included a series of videos that outline the complete process. It’s a bit general for a first series and the intent is to give you an overview of the process.

For videos, part one of the series is here (check the channel for the rest):

Typically, the process involves these (or some of) these steps:

  1.  CAD plan design
  2. 3D Model
  3. Render
  4. Post production and Layout

Sometimes, you are introduced into the process along one of these phases with little to no control of the preceding ones (ie 3d model). That may not be ideal, but there are still plenty of options available to make the most out of your design.

1 CAD Plan

base-map

This part typically involves drafting a proposed design in 2d in CAD. Any program can be used (Rhino, AutoCAD, MicroStation-wait what?) It essentially is drawing it to scale or to 1 to 1 in 2d and in plan.


2 3D Model

After you have a 2d plan drawn out you are ready to switch into the third dimension. The following programs are widely used these days to develop 3d models for site representation:

  1. Rhino 3d
  2. Sketchup
  3. 3D studio Max
  4. Lumion

Each has their strengths and weaknesses. Some are easier to pickup than others. By far, Sketchup is the easiest to pick up, followed quickly by Rhino and Lumion. 3DS Max has some expanded capabilities that the others don’t have, such as complex animation, but unless you are Pixar you won’t have much use for them when it comes to site design. All can do flyovers, if that’s something you think you need. The only caveat I’ll put out there is that even though Sketchup is easy to pick up, it is fairly limited. Incidentally, it has some creepy way of inviting itself into the design. For some reasons, designs that were modeled in Sketchup, end up looking like they were made in Sketchup. I don’t know if that makes much sense… Sketchup products tend to stick out like a sore thumb and I think the reason is because they are very minimalistic in terms of their palette range. The same can be said about Lumion. Even though it looks great initially, I’m not too satisfied with the built in renderer at the moment. It has a very “plasticky” feel to it. However, the advantage is that these two products are easy to pick up.

4. Rendering

Once you are done modeling your site, you are ready to step into production mode. There are several ways you can prep your site for post-production. An easy step (or when you are in a pinch) is to export a screenshot of your view and dump it into Photoshop.

1

However, these days, it’s pretty typical to include a 3d renderer in the process. The most common ones around the market are VRAY (The best!), Flamingo, Maxwell, Kerkythea, and a few others. Lumion has a built in renderer (I’m not a big fan). Prices for these vary from free to pretty costly (see Maya).

2

There are several advantages to using a third party renderer. The most obvious one of course, is the quality of the output. If you’re going to spend all this time modeling something cool, then why sacrifice it to a poor screenshot? Use a renderer! Another great highlight is the ability to apply textures to your objects. Let’s say you’re modeling a wooden bench cover is some kind of ipe wood (or even better, Italian marble!), then you would throw a texture on it. The renderer will take care of all the ways light in your scene interacts with the material and you will save LOTS of time in Photoshop by not having to throw materials on every single surface. Use a renderer.


5. Post Production and Layout

closeup02

This is part is typically where you’ll end up loosing a lot of time because it’s so much fun to play in Photoshop. Here, you are going to do your best to persuade your peers and classmates that you’ve got the chops to cobble something worthy of a portfolio insert. But I’m going to let you in on a secret.

If you did your due diligence during the first and second parts outlined here you are golden. And the reason I say that is because there is a reason the renderer (VRAY, Flamingo, Maxwell, Mental Ray, etc) is so critical in the process. The renderer is what adds that level of realism you are looking for. It’s not the photo bashing or the lens flare or the hot air balloons in the background. Let the renderer do the heavy lifting (textures, lights, shadows, ambient occlusion, volumetrics) and post production becomes a breeze. Pick a renderer, and learn it well. It will serve you well.


That’s it. These are the most frequently used components utilized in making fancy render stuff. The rest is hot air balloons in the background.